NextCloud – Ubuntu 20.04 LTS
1.Preparations Ubuntu 20.04 LTS
You need an Ubuntu 20.04 LTS on a root/ vServer of your choice. I can recommend “Hetzner“. There you can order a v-server billed by the minute and try out your cloud directly.
If you use my affiliate link, Hetzner will give you 20 EUR to try it out.
https://hetzner.cloud/?ref=JzOsvjRDbjiL
Alternatively, NextCloud can also be operated at home, for which there are various options (recommendation links from Amazon):
- cheap: https://amzn.to/3dxa94J
- the middle class: https://amzn.to/3dxa94J (CPU, RAM any many LAN connections):
- Power User: https://amzn.to/3qIJZ2t
Next, we update the system and install unzip:
sudo apt update && sudo upgrade -y
sudo apt install unzip
1.1 Install Apache 2 web server
Für unseren Server haben wir uns für den Apache2 Webserver entschieden und installieren diesen mit folgendem Befehl und prüfen direkt im Anschluss den Status:
sudo apt install -y apache2 apache2-utils
systemctl status apache2
The output should look something like this:
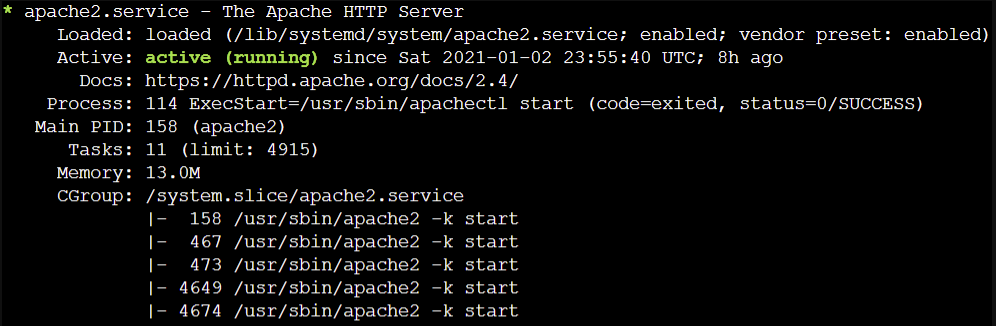
If the service does not run, you can start it with the following command:
sudo systemctl start apache2
The service is now running, but would not start on reboot. So that Apache2 also starts again at the next system start:
sudo systemctl enable apache2
1.2 Install MariaDB database
We install MariaDB via the command line and then check the status output, similar to the Apache2 web server:
sudo apt install mariadb-server mariadb-client
systemctl status mariadb
The database is installed. The output of the systemcrl status mariadb looks like this or something similar:
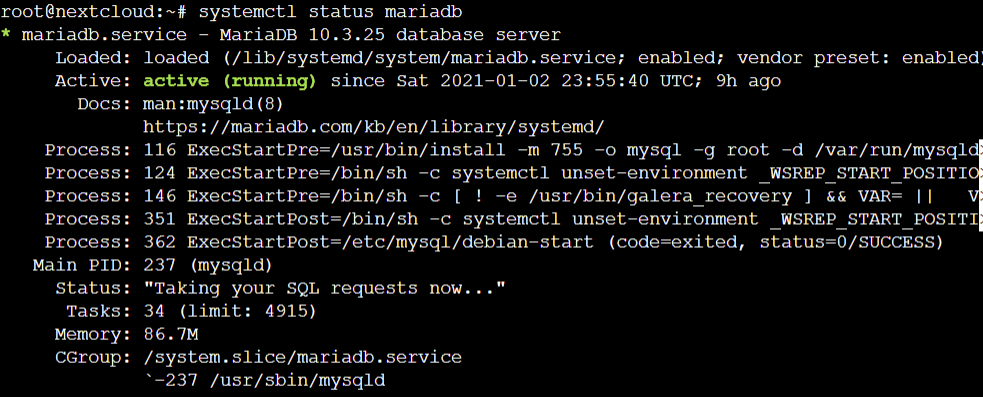
If the database is not started immediately, you can do this with:
sudo systemctl start mariadb
Here, too, we add the instruction to restart the database if we reboot the system:
sudo systemctl enable mariadb
We then run the post-installation security script.
sudo mysql_secure_installation
Since the database does not yet have a password, we can simply answer the first question of the password with ENTER. Now we are asked for a password and we answer with Y to assign a new root password for MariaDB. REMEMBER or WRITE IT DOWN!
BILD
You can answer all other questions by pressing ENTER. No more information is required here.
We can now also log in via the ROOT rights of our OS root user. This can be done with the following command:
sudo mariadb -u root
exit;
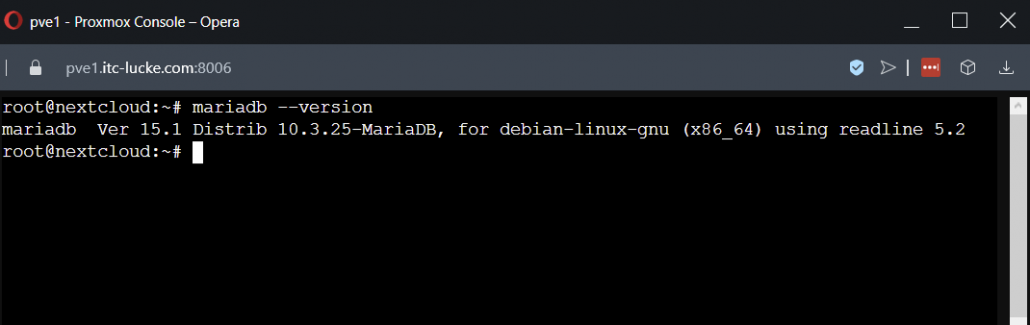
With exit; we leave the database environment again. We can now take a look at the release notes:
mariadb --version
1.3 Install PHP 7.4
The current version is 7.4:
sudo apt install php7.4 libapache2-mod-php7.4 php7.4-mysql php-common php7.4-cli php7.4-common php7.4-json php7.4-opcache php7.4-readline php7.4-fpm
We have chosen php-fpm (FastCGI Process Manager version) and activate this as follows, and then restart Apache2:
sudo a2enmod proxy_fcgi setenvif
sudo a2enconf php7.4-fpm
sudo systemctl restart apache2
With this we have installed PHP on the Ubuntu and with this we check the version:
php --version
2. NextCloud-Installation
2.1 Download and unpack Nextcloud
We log into our Ubuntu as root and download the current installation file from the Nextcloud website. At the time of the script, this is version 20.0.4:
wget https://download.nextcloud.com/server/releases/nextcloud-20.0.4.zip
We now unpack the installation package into the directory /var/www/nextcloud/ and assign the rights for our Apache2:
sudo unzip nextcloud-20.0.4.zip -d /var/www/
sudo chown www-data:www-data /var/www/nextcloud/ -R
2.2 Create database for NextCloud
Now we create a database and a database user. You can choose these freely, but make a good note of them. We will need them later for the installation. In my case, I named the database ‘nextcloud' and the user ‘nextclouduser'. You can choose any of these, but replace them with your values in the following lines. Likewise the ‘yourpasswd':
sudo mysql

create database nextcloud;

create user nextclouduser@localhost identified by 'yourpasswd';

grant all privileges on nextcloud.* to nextclouduser@localhost identified by 'yourpasswd';

flush privivleges;

exit;
2.3 Creating a virtual host in Apache2
In our example here, we create a virtual host. You may have other websites that you want to host here. You should now have configured a domain on your server. In my case I have chosen cloud.my-domain.com. This is a subdomain. Create an A record in your DNS administration for the domain: cloud.your-domain.com should point to the server IP.
sudo nano /etc/apache2/sites-available/nextcloud.conf
The following content goes into this file, but remember to replace the cloud.my-domain.com with yours.
        DocumentRoot "/var/www/nextcloud"
        ServerName cloud.meine-domain.com
        ErrorLog ${APACHE_LOG_DIR}/nextcloud.error
        CustomLog ${APACHE_LOG_DIR}/nextcloud.access combined

            Require all granted
            Options FollowSymlinks MultiViews
            AllowOverride All

               Dav off

        SetEnv HOME /var/www/nextcloud
        SetEnv HTTP_HOME /var/www/nextcloud
        Satisfy Any
Now we prepare Apache for the virtual host and activate Apache modules:
sudo a2ensite nextcloud.conf
sudo a2enmod rewrite headers env dir mime setenvif ssl
We can test the configuration:
sudo apache2ctl -t
We then restart Apache.
sudo systemctl restart apache2
In my case, calling cloud.my-domain.com still showed the default start screen of Ubuntu Apache2. We still have to deactivate the default virtual host here:
sudo a2dissite 000-default
Now we install the required PHP modules:
sudo apt install php-imagick php7.4-common php7.4-mysql php7.4-fpm php7.4-gd php7.4-json php7.4-curl  php7.4-zip php7.4-xml php7.4-mbstring php7.4-bz2 php7.4-intl php7.4-bcmath php7.4-gmp

sudo systemctl reload apache2
With this, I could already access the Nextcloud via IP/ domain name in the browser.
2.4. Let's Encrypt
Safe is safe, here too the awarding of a certificate is sensible and important. Our cloud should be secure! For this purpose, we install the Certbot:
sudo apt install certbot python3-certbot-apache
Next, we run the following command to get a free Let's Encrypt certificate. Replace the email and domain back to your values.
sudo certbot --apache --agree-tos --redirect --staple-ocsp --email email@meine-domain.com -d cloud.meine-domain.com
We still activate the HSTS header in nextcloud-le-ssl.conf:
sudo nano /etc/apache2/sites-enabled/nextcloud-le-ssl.conf
Here we insert the following line above the line:
Header always set Strict-Transport-Security "max-age=31536000"
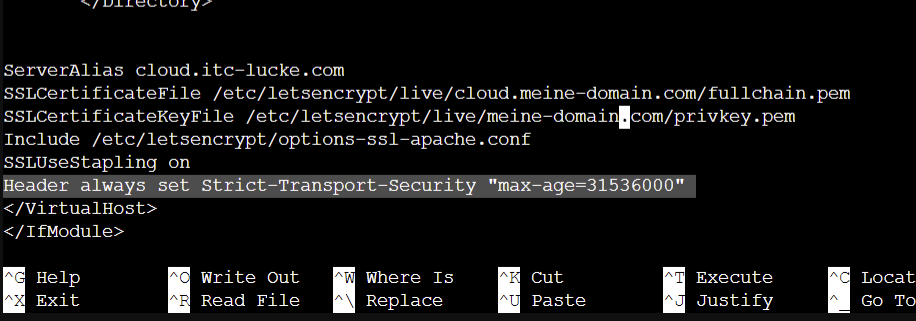
We let Apache2 check the configuration again before restarting the service:
sudo apache2ctl -t
sudo systemctl reload apache2
2.5 Set data directory and complete installation
I do not want the data to be in the subdirectory /var/www/nextcloud but in parallel in /var/www/cloud-data. You can also choose a different storage location, then simply replace the path with your own!
sudo mkdir /var/www/cloud-data
sudo chown www-data:www-data /var/www/cloud-data -R
A lot of preparation has been done so far, now it's off to the browser and we kick off the actual installation:
https://cloud.meine-domain.com
We now see the classic blue NextCloud screen and can create an ADMIN account. I do not recommend the classic admin or root here, but choose your own. Choose a password and enter it.
Our data directory is now entered under the Data Folder field:
/var/www/cloud-data/
Then we add the database data.
Nextcloud now performs the installation and we can then log in with the admin account and create users.
If you forget your root access, you can connect to the server via the console and reset the password with:
sudo -u www-data php /var/www/nextcloud/occ user:resetpassword nextcloud_username
2.6 Optimise NextCloud
2.6.1. Memory Limit
2.6.2 Set up cache
2.6.3 Add missing indexes
3. fail2ban
fail2ban can be used not only for e-mail or SSH access, but also to protect our NextCloud against access by third parties by blocking the user's access after a predefined number of failed attempts.
For this we download the fail2ban package:
apt install fail2ban
Then we create a log file in which the failed attempts are stored and which is read out by fail2ban. This file must be provided with the appropriate rights for the web server.
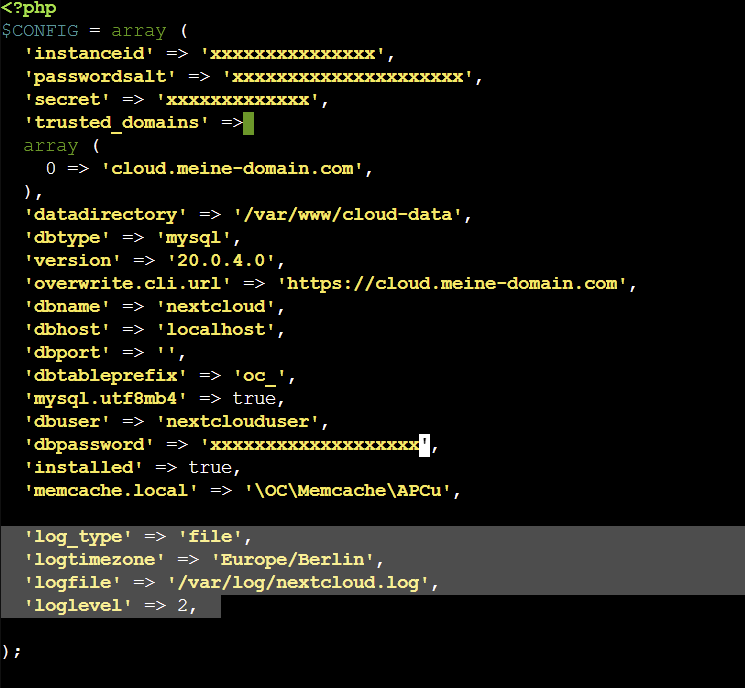
Now that we have a log file, we can tell NextCloud to log failed attempts in this very file. To do this, we need to make changes in the following file. To do this, we call our Nano with the file:
nano /var/www/nextcloud/config/config.php
We now need to insert the following block into the file:
'log_type' => 'file',
'logtimezone' => 'Europe/Berlin',
'logfile' => '/var/log/nextcloud.log',
'loglevel' => 2,
Then we create a filter for the NextCloud. We do this by creating the following file:
nano /etc/fail2ban/filter.d/nextcloud.conf
We then write the content in it as follows:
[Definition]
_groupsre = (?:(?:,?\s"\w+":(?:"[^"]+"|\w+)))
 failregex = ^{%(_groupsre)s,?\s"remoteAddr":""%(_groupsre)s,?\s"message":"Login failed:
             ^{%(_groupsre)s,?\s"remoteAddr":""%(_groupsre)s,?\s"message":"Trusted domain error.
 datepattern = ,?\s"time"\s:\s*"%%Y-%%m-%%d[T ]%%H:%%M:%%S(%%z)?"
Now we create a new jail for fail2ban. To do this, we call up our editor again with the following file:
nano /etc/fail2ban/jail.conf
The following block is then added at the end of the file:
[nextcloud]
backend = auto
enabled = true
port = 80,443
protocol = tcp
filter = nextcloud
maxretry = 3
bantime = 86400
findtime = 43200
logpath = /var/log/nextcloud.log
The line action = sends an e-mail to the admin. If this is not desired, you can also omit it. We restart the service:
service fail2ban restart
Now we can also test the filter:
fail2ban-client status
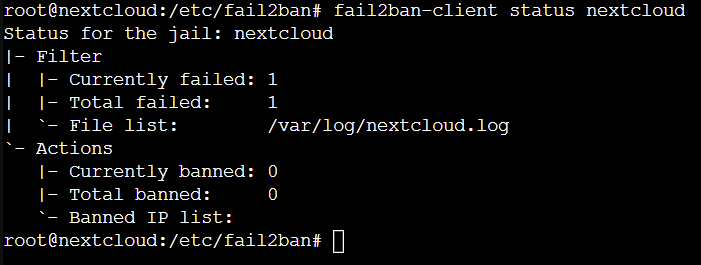
After an attempt to log in and use a wrong password, the failed attempt could be seen directly.
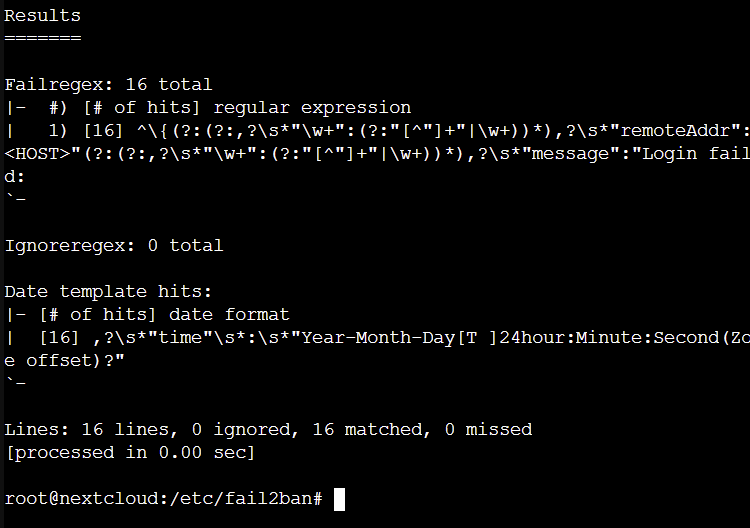
Here is a closer look at the filter:
fail2ban-regex /var/log/nextcloud.log /etc/fail2ban/filter.d/nextcloud.conf
With this, we have also completed the locking out of strangers.
I hope the tutorial was understandable and you got through it well. If you have any questions, write in the comments or send me an email.
Regards, Sascha
Sources:
https://www.linuxbabe.com/ubuntu/install-nextcloud-ubuntu-20-04-apache-lamp-stack
https://www.linuxbabe.com/ubuntu/install-lamp-stack-ubuntu-20-04-server-desktop
https://askubuntu.com/questions/1010300/apache-virtual-host-not-working


Leave a Reply
Want to join the discussion?Feel free to contribute!